How to add Bluetooth to your Arduino Project with BTduino
This tutorial will show you how to connect your Arduino project to an Android device using the BTduino app. You don’t need an extra Arduino library and you don’t need to code anything on the Android side.
Here is what you need:
- an Android device running Android 4.0 or higher that supports bluetooth (most phones do)
- an Arduino or any microcontroller that has a Serial connection
- a bluetooth module for the Arduino (get one for about €10, for example from ebay)
- the parts for your project
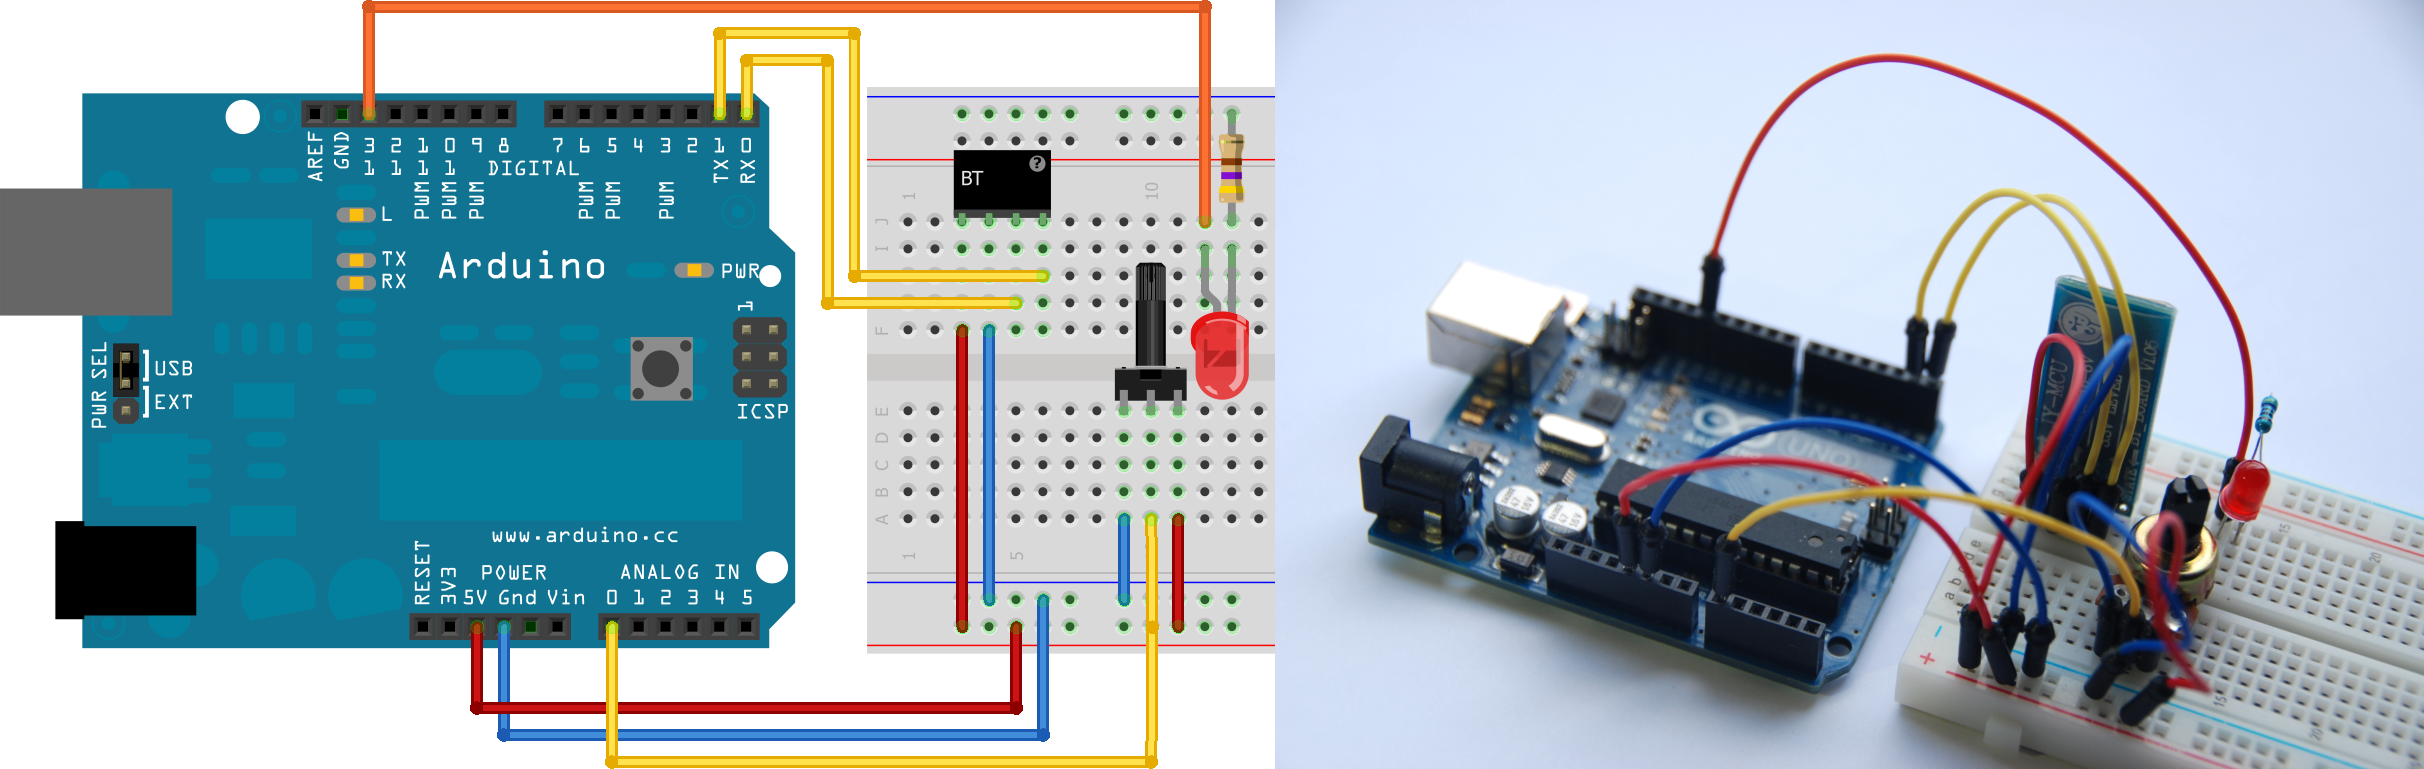
Connect the bluetooth module to your Arduino like this:

If your bluetooth module runs at 3.3V, you need an additional voltage divider. In this case, use three resistors with an equal value between 1kΩ and 10kΩ as shown above.
Then, set up your Arduino project. For this tutorial I will be using a potentiometer and an LED. Here is the setup:
Now install the BTduino app on your device:
Download it here or scan the QR code on the right.
The main concept of the BTduino app is to send data through the serial interface in text form. Every set of data contains the name of the event, a colon and the value:
name:valueTo send the value of the potentiometer to the BTduino app, you just have to make the Arduino send something like “A0:4”. Here is the code:
Serial.begin(9600);

void loop() {
    Serial.println("A0:" + String(analogRead(0)));
    delay(200);
}
Now it’s time to start the app and establish a bluetooth connection. To do so, click on the connect button on the bottom right of the screen. Enable bluetooth if prompted. Your bluetooth module should show up in the list. If you are asked for a pin, try 0000 or 1234.
You can show the raw text data that is sent by the Arduino using the bluetooth console. However, the point of this app is to interpret the received data. Click “Exchange values” and a screen will show up that displays the events of your bluetooth project. The event that was named “A0” by the above Arduino code will show up automatically. You can display a gauge or a plot of the data by clicking the icons next to the value display. Play around with the potentiometer to see how the value changes.

To add an event for the LED, click the plus icon in the BTduino app. Enter “led” for the name and select the “Send boolean” event. Every time you click the button on the new event, the app will send either “led:false” or “led:true” to the Arduino
Receiving data at the Arduino is a bit more complicated than sending because you will have to read and interpret the serial data. So a good point to start is this example sketch that provides a base for BTduino projects.
Open a new Arduino sketch and paste the content of the example sketch. To use the LED, declare a variable for the pin and set the pin mode in the setup function:
int ledpin = 13;
...
pinMode(ledpin,OUTPUT);
Every time a full line of text is received, the function receiveline will be called. After the comment Check events you have acces to the string variables name and value. To switch the LED, add this code:
if (name == "led") {
    if (value == "true") digitalWrite(ledpin,HIGH);
    if (value == "false") digitalWrite(ledpin,LOW);
}
This is one of the examples provided by the sketch so you just need to remove the comment. Upload the sketch and you should be able to turn the LED on and of from your Android device!
That’s it for the tutorial. You can take a closer look at the example sketch to see what else this app is capable of. Also, every event that you can add to your project in BTduino provides an example if you long-click it and select “About”. For more information, take a look at the events documentation. There is a troubleshooting page for frequent problems. Please send me an email if you have any problems, if you want to report a bug or request a feature or if you built a project with BTduino.
Also, you might want to take a look at this guide to change some of the bluetooth module’s settings. I changed the baud rate of my module to 57600. At the standard rate of 9600 it takes about 1ms to send one character which can slow down a time-critical project.